With the release of async/await in Swift 5.5, the ergonomics of writing server side Swift have improved dramatically, but language improvements are only half the battle when it comes to building a scalable server side Swift application. In the past you needed to manage your own Dockerfiles, networking stack, and pay for long running servers, in a single region, just to start serving traffic from your application. What if there was a more performant, more cost efficient way to deploy Swift to the cloud without managing any infrastructure and only paying for what you use? Today I will show you two ways to easily deploy a Swift application to Fastly Compute@Edge.
What is Compute@Edge?
Before diving into Swift, it's important to understand what Compute@Edge is and what it is not, what its benefits are and what some of its drawbacks are.
Fastly’s Compute@Edge offering allows you to build high scale, globally distributed applications and execute code at the edge — without having to manage the underlying infrastructure. Deploy and run complex logic for any application or backend service with our secure, performant, and scalable approach to serverless computing.
The key concept to understand is that Compute@Edge is a serverless WebAssembly runtime that deploys and runs your code globally on Fastly's CDN network. What this means in practice is that Fastly manages the entire networking stack for you - there is no need to run an HTTP server (ex. Vapor), you simply handle the incoming request from Fastly and deliver a response. The benefit of this is you get a lot of really great networking features for free such as HTTP/3, global routing and failover, simple custom domains, and a lot more.
Wait a second, what does WebAssembly have to do with this?
Fastly chose to build their secure runtime with WebAssembly, specifically Wasmtime, an open source project that is part of the Bytecode Alliance. Most people think of WebAssembly (WASM) as being a browser feature for building high performance web applications, but in reality WASM is a spec that any language can compile to if the maintainers build support for it. Luckily for Swift, we have the incredible SwiftWASM project which is doing just that. By compiling our Swift to WASM we can deploy Swift applications to any WASM runtime, including Compute@Edge.
Building a server side Swift application
Before we can deploy to Fastly, we need to write a compatible Swift application. This tutorial is going to focus on Xcode and macOS 11 but it will work all the same on Linux or any operating system where you installed the latest version of the Swift toolchain.
Create a Swift project
To start make sure you have the latest version of Xcode / Swift installed on your machine. Then head over to the command line and start a new Swift project:
mkdir EdgeApp
cd EdgeApp
Create a new directory for your Swift app
swift package init --type executableCreate a new Swift package using the executable template
Launch Xcode and open the newly created Package.swift file. You need to add a single dependency that allows us to interact with the Fastly runtime:
.package(
    url: "https://github.com/AndrewBarba/swift-compute-runtime",
    from: "1.0.0"
)
Compute is a dedicated SDK for working with Compute@Edge in Swift
And finally add the Compute package as a dependency:
.executableTarget(
    name: "EdgeApp",
    dependencies: [
        .product(name: "Compute", package: "swift-compute-runtime")
    ]
)
And that's all we need to start writing server side Swift applications on Fastly.
Write a Swift application
To begin writing your Swift application we are going to rename the auto-created main.swift file to App.swift (or any name you want other than main). The reason for this is we want an async/await entry point to our application, and as of Swift 5.6 this is not possible in main.swift. Good news though - Swift 5.7 fully enables top level async/await so this step wont be necessary in the near future.
Rename main.swift to App.swift and paste in the following code to get started:
import Compute

@main
struct App {

    static func main() async throws {
        try await onIncomingRequest(handler)
    }

    static func handler(
        req: IncomingRequest,
        res: OutgoingResponse
    ) async throws {
        try await res.status(.ok).send("Hello, Swift.")
    }
}
This is a fully working server side Swift application
At this point you have a fully functional server side Swift application - although admittedly it's not doing too much. Look out for a new blog post where we do a deep dive into making network requests, streaming data, and a whole lot more. For now, let's keep it simple and move on to deployment.
Deploy to Fastly
We're going to cover two different ways to deploy your application to Fastly:
- Using your own Fastly account and GitHub Actions
- Using Swift Cloud - a fully managed platform as a service
It's important to understand what it takes to manually deploy the application to Fastly, and then you can really appreciate how much Swift Cloud is automating for you.
Deploy to your own Fastly account
You'll need a couple things before we can begin:
- A Fastly account with access to Compute@Edge
- A Fastly API Key with write privileges
- Your repository pushed up to GitHub
Assuming you have these in order, start by heading over to your Fastly console and creating a new "Compute" service:

Once created, go to your GitHub repository settings and add two new secrets:
FASTLY_API_TOKEN- the Fastly API key you created earlierFASTLY_SERVICE_ID- your newly created Compute service ID
Next, create a new file fastly.toml in the root of your project and paste in the following:
language = "swift"
manifest_version = 2
Next, create a new empty file in your repository at .github/workflows/deploy.yml and paste in the following:
name: Deploy

on:
  push:
    branches:
      - main

jobs:
  deploy:
    runs-on: ubuntu-latest
    container: ghcr.io/swiftwasm/carton:latest

    steps:
      - uses: actions/checkout@v2

      - run: swift --version

      - name: Swift Build
        run: swift build -c release -Xswiftc -Osize --triple wasm32-unknown-wasi

      - name: Optimize Wasm Binary
        run: wasm-opt -O2 -o ./.build/release/EdgeApp.wasm ./.build/release/EdgeApp.wasm

      - name: Set up Fastly CLI
        uses: fastly/compute-actions/setup@main

      - name: Package for Compute@Edge
        run: fastly compute pack --wasm-binary ./.build/release/EdgeApp.wasm

      - name: Deploy to Compute@Edge
        uses: fastly/compute-actions/deploy@main
        with:
          service_id: 4LzohioVG3efcZHSeUpCEg
        env:
          FASTLY_API_TOKEN: ${{ secrets.FASTLY_API_TOKEN }}
Let's walk through each step of this deploy process:
Container
container: ghcr.io/swiftwasm/carton:latestWe're building using the Docker container from SwiftWASM's Carton project. It's critical to build using this container instead of the official Swift container from Apple until WASM support is merged upstream. Note: we could also build from swiftwasm/swift containers but the Carton container also provides with some nice tools for optimizing the final binary.
Build
swift build -c release -Xswiftc -Osize --triple wasm32-unknown-wasiWe want to run swift build in the release configuration and target WASM. We also optimize for size as this can greatly affect your cold start times. More on this later.
Optimize
wasm-opt -O2 -o ./.build/release/EdgeApp.wasm ./.build/release/EdgeApp.wasmThe next two steps are critical for further optimizing your WASM binary. We are using an open-source tool called Binaryen which strips unused symbols from the WASM binary, greatly reducing its size. This size reduction is critical for fast cold start times on the Fastly platform. The smaller the binary, the faster Fastly can download and unpack your binary when serving requests.
Package
fastly compute pack --wasm-binary ./.build/release/EdgeApp.wasmThis step compresses together the fastly.toml file created earlier, and your final WASM binary. This compressed package is what will be uploaded to Fastly on deploy.
Deploy
fastly/compute-actions/deploy@mainFinally, this step deploys your application to Fastly using the provided Service ID and API Key. Deploys take anywhere from 20s - 30s, although Fastly is working hard to reduce this time even further. Once deployed you should see a URL where you can visit and see your application return the basic response.
Deploy with Swift Cloud
Now that we've seen the manual steps to deploy to your own Fastly account, let's deploy our application with Swift Cloud.
First, head over to console.swift.cloud and create a new account by connecting with GitHub.
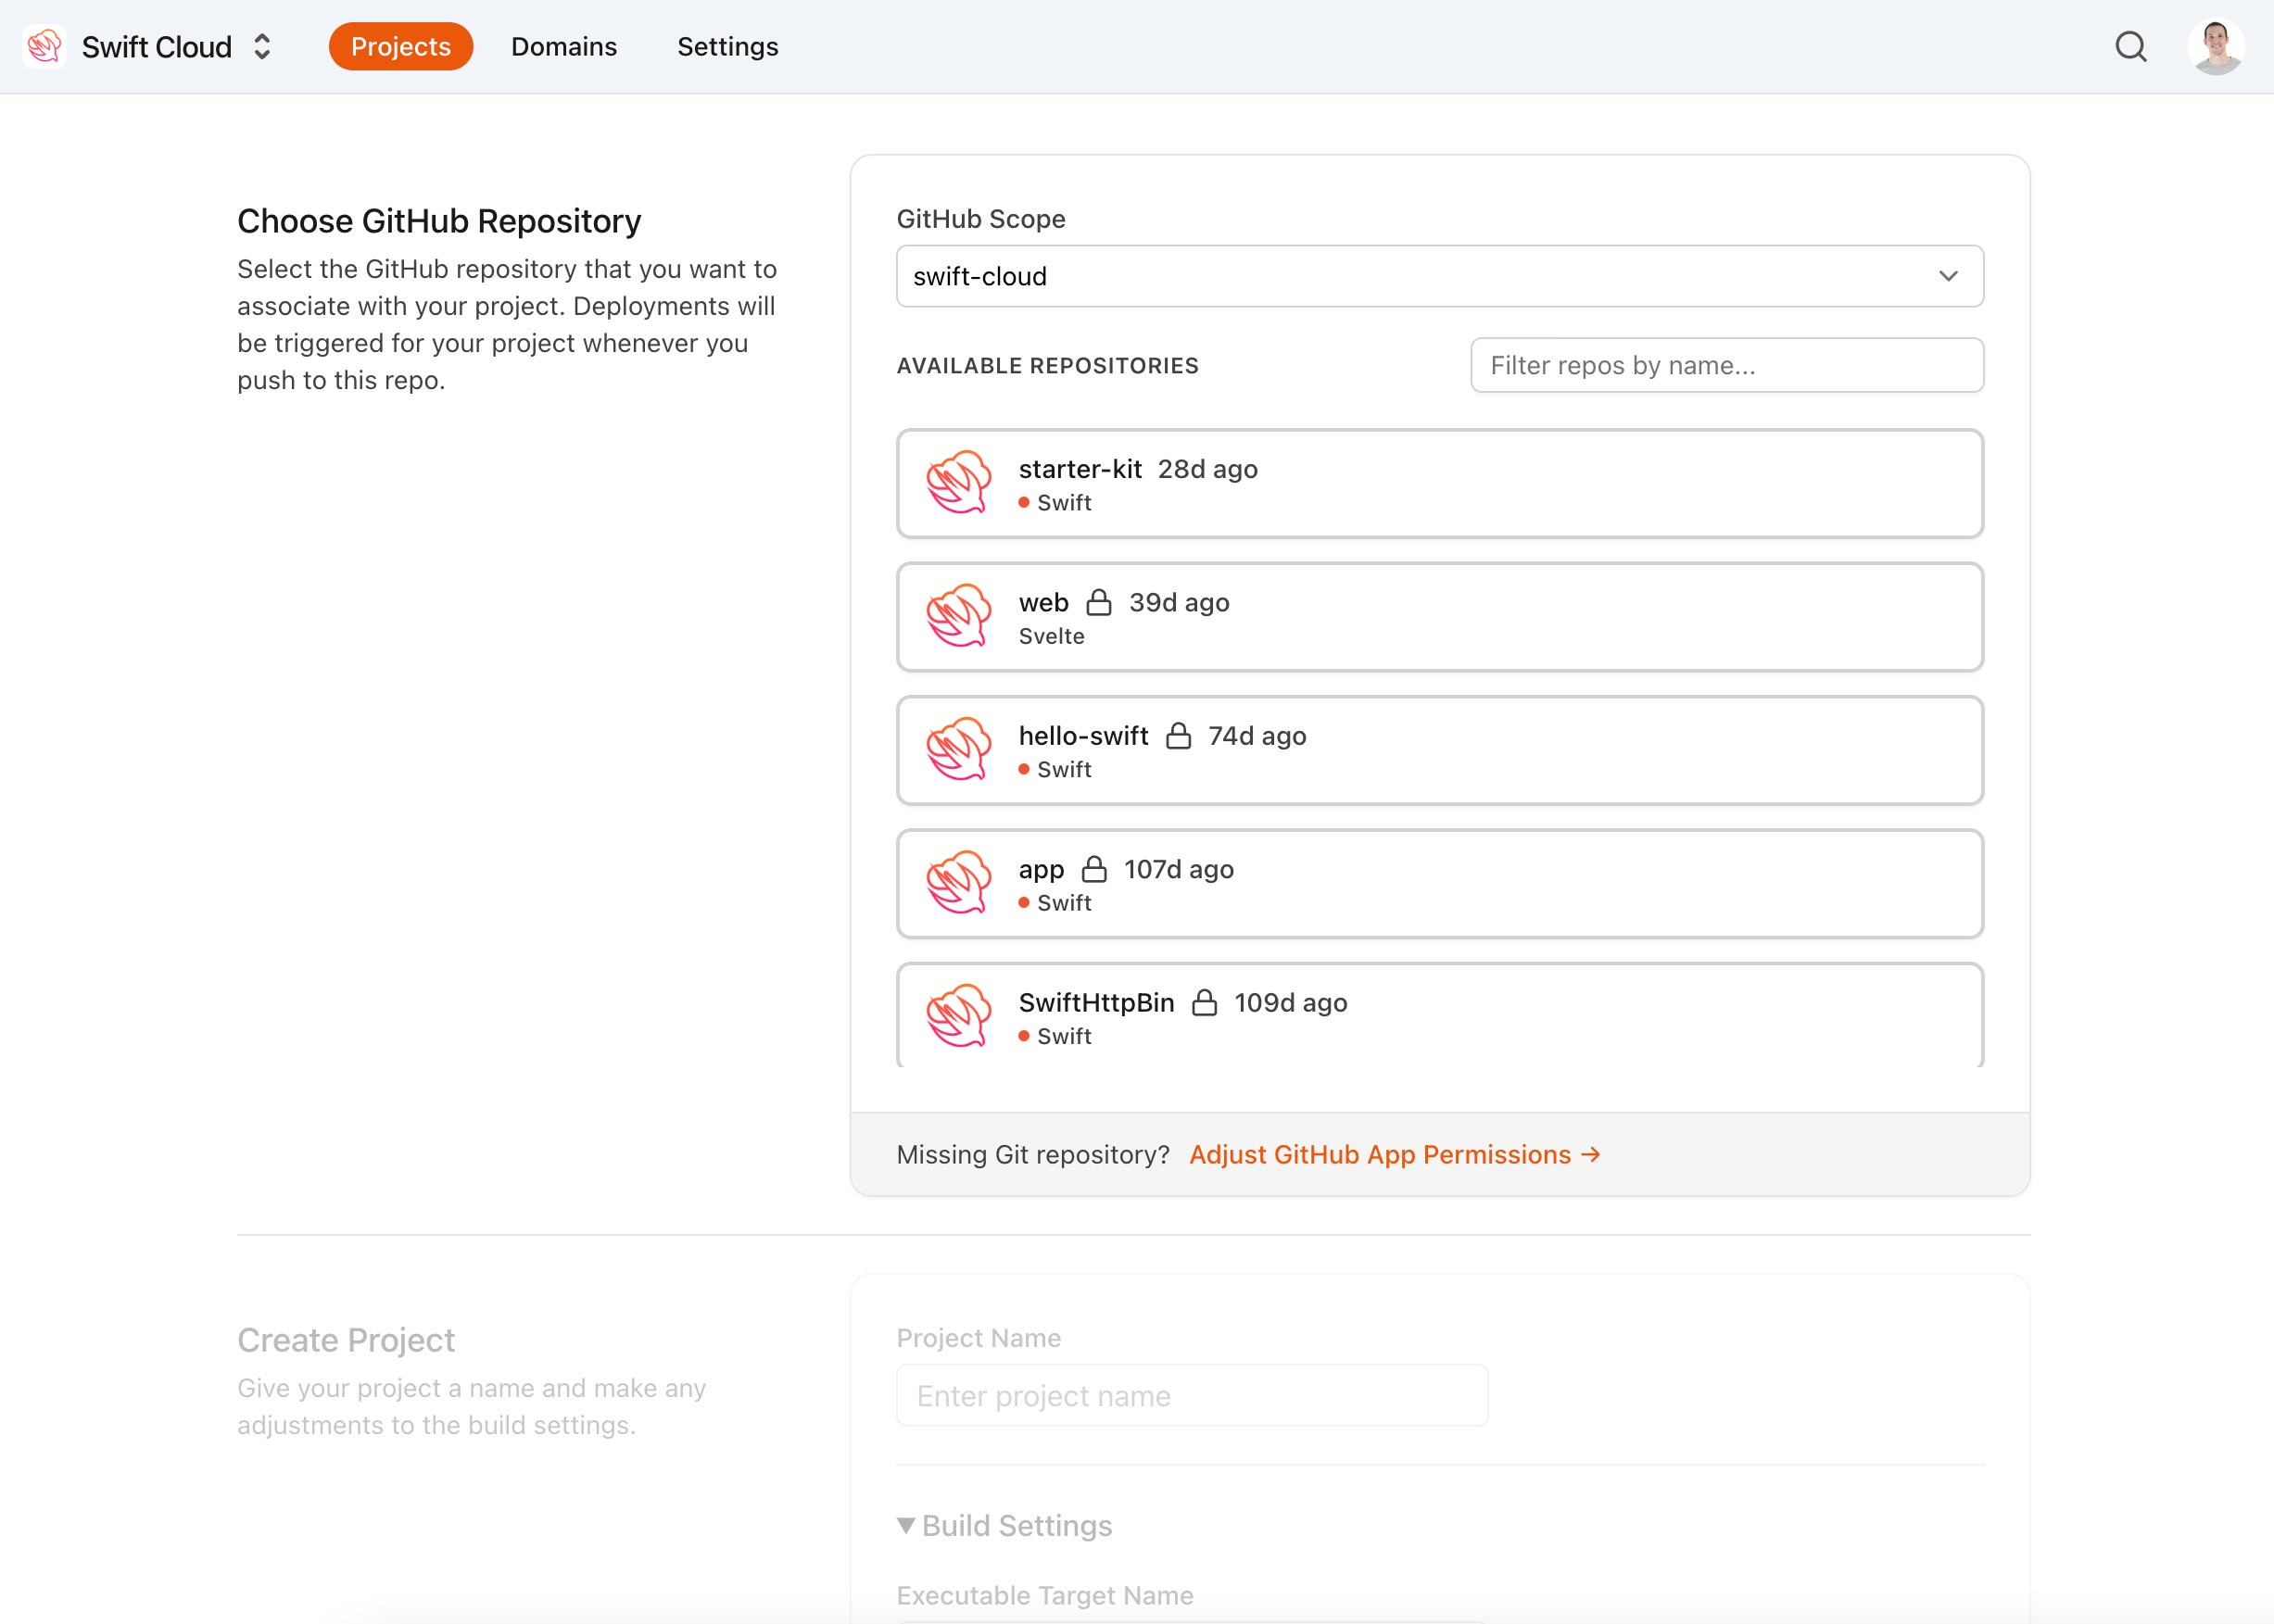
Next, click the + button next to "Projects" to create a new project. Search for your repository and select it.

Now we need to tell Swift Cloud which target to deploy. Type in "EdgeApp" for your target name, or whatever name you chose for .executableTarget() in your Package.swift file, then click "Create Project".

Before we deploy, you have a chance to customize your project with a custom domain name, as well as additional project settings like external origins, dictionaries and more. We will cover these features in another blog post.
Finally, scroll down to the bottom and click "Deploy".
And that's it. Swift Cloud will build your application using SwiftWASM, optimize it with Binaryen, and fully manage a Fastly service behind the scenes. Once deployed you can look at realtime request metrics, tail your logs, and more.
What's Next
We merely scratched the surface about what it takes to deploy a server side Swift application to Fastly. There's a lot more to cover like testing your application locally, assigning custom domains, making external fetch requests, using Edge dictionaries, and taking full advantage of the Fastly networking stack that we are building upon. We hope to cover all of these topics and whole lot more in upcoming blog posts. In the meantime, check out the Swift Cloud beta and documentation and let us know what you think.